VISITview comes up with a Big Red Pointer being shown on the screen. You move this pointer by positioning your mouse pointer to a different location in the window and clicking it. When you do this, a message is sent to the VISITview server which then tells the software for all the students to move the Big Red Pointer. Therefore, you will see a slight time delay in actually repositioning the pointer after you click your mouse button.
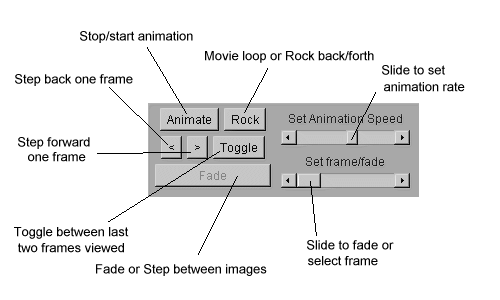
Here's a summary of all the keystrokes and mouse-related buttons:
Please note that these controls affect everyone in the session! In the example shown, note that the word "Fade" is diminished in intensity. This means that for the page of the lesson being viewed, fading is not available.
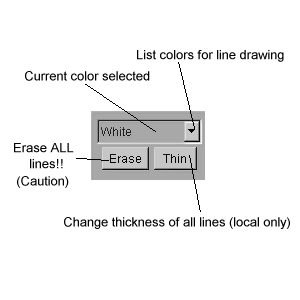
The second set of controls is used for annotation (free-hand line drawing). You may select a color and a width (although the width is only for you, in case you want to make thin lines which may otherwise be obscuring some feature you want to look at in the underlying image).
The final set of controls are available only to the master session. They control, literally, what page you're on in the lesson. In place of this set of controls, the students will see the label of the current page.
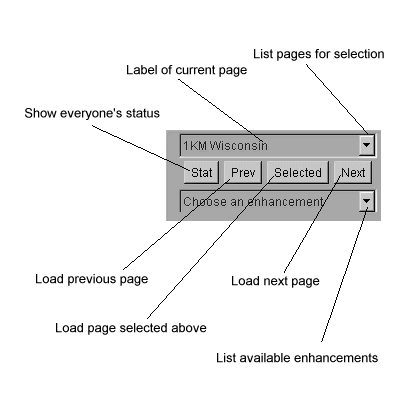
The Stat button will give you an indication of the status of the last load command sent to all the students. In the Applet Status Line (at the bottom of the screen), a message will appear that looks something like this:
Status of load: OK -- OK OK -- OK -- OK
This indicates that of the 8 people connected for this session (including yourself), 3 have not yet finished loading the page you just went to. You should view this especially when using the remote mode, where some or all of the students are getting their images (pages) over the Internet.
The bottom choice box is for enhancements. If you've included the "enhance" tag in the HTML and supplied a text file with the enhancements in it, their names will appear here. You may select any enhancement from the choice list -- as soon as you do, the enhancement will be applied to the image(s) on this page.
Return to VISITview home page.