If you want to try it out, follow these instructions:
Which ever of these you type, the VISITview server should respond with
a message like:
VISITview server listening on port 1631
You are now running VISITview in the "local" mode (if you used the
first form) or in the "remote mode" (if you're using your browser).
If all is well, a Big Red Cursor will appear on the screen along with a
set of controls. If the B.R.C. does not appear, it is likely
that the server is not running, or your TCP/IP host table is not configured
to understand "localhost".
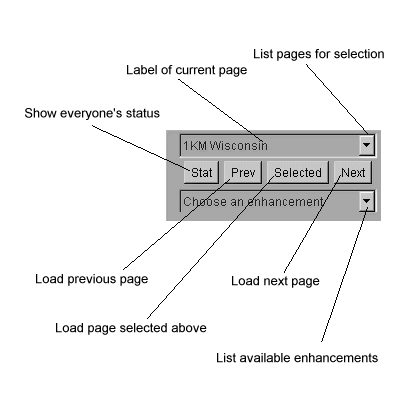
On the lower left corner is a set of controls that looks like:

If you'd like more information on these controls, please go to the VISITview Home Page. This page also contains links for instructions on creating your own lesson and setting up the student environment.
In order to use VISITview in a networked environment, you may operated in one of two modes: local mode is where a copy of the image and program files reside on each student's computer (or on a common network/NFS disk). In this case, you may use the jre method of running VISITview on each students' machine. You will still need to have one computer running the server, however. This setup should be used in wide-area networks when considerable variations in throughput might be experienced.
In the remote mode, students only need to have a Web browser on their computers. In this mode, however, the machine that is running the VISITview server must also be running a Web (httpd) server to service the students' browsers. In this type of setup, the image and program files reside only on the server machine (in a directory accessible to the httpd server), and are sent to the students' machines while the lesson is in progress. This mode is quite suitable for a well-connected network.
If you have any questions, please send email to: Tom Whittaker (tomw@ssec.wisc.edu)
Thanks!!